![]()
Application instructions
For details about compatible Pioneer products, refer to the Operation Manual bundled with the product.
Starting the Pioneer ARC (Advanced Remote Control)
Before you can use the Pioneer ARC application, you need to connect the compatible Pioneer product you are using with the mobile device via USB or Bluetooth®. For details about the available connection and the connection method, refer to the Operation Manual bundled with the product.
Connections
When you connect your mobile device again after finishing the following settings, connect it via USB or press and hold the M.C. dial to start the Pioneer ARC.
NOTE
The following names of settings and buttons may vary depending on your product.
iOS via USB connection
1Press the M.C. dial to display the main menu.
2Turn the M.C. dial to select [SYSTEM], then press to confirm.
3Turn the M.C. dial to select [PHONE CONNECT], then press to confirm.
4Turn the M.C. dial to select [IPHONE/IPOD], then press to confirm.
5Turn the M.C. dial to select [WIRED], then press to confirm.
6Press SRC/OFF to select any source.
7
Check that the iOS device is connected to the main unit via USB and press and hold the M.C. dial.
The application on the mobile device starts.
NOTE
When the application does not start, launch it on the iOS device.
iOS via Bluetooth connection
1Press the M.C. dial to display the main menu.
2Turn the M.C. dial to select [SYSTEM], then press to confirm.
3Turn the M.C. dial to select [PHONE CONNECT], then press to confirm.
4Turn the M.C. dial to select [IPHONE/IPOD], then press to confirm.
5Turn the M.C. dial to select [BLUETOOTH], then press to confirm.
6Press SRC/OFF to select any source.
7
Press and hold the M.C. dial.
The application on the mobile device starts.
NOTE
When the application does not start, check whether your device is properly connected to the main unit via Bluetooth.
If your device is connected properly to the main unit, launch the Pioneer ARC on the iOS device.
Android via USB connection
1Press the M.C. dial to display the main menu.
2Turn the M.C. dial to select [SYSTEM], then press to confirm.
3Turn the M.C. dial to select [PHONE CONNECT], then press to confirm.
4Turn the M.C. dial to select [ANDROID], then press to confirm.
5Turn the M.C. dial to select [WIRED], then press to confirm.
6Repeat steps 1 to 2.
7Turn the M.C. dial to select [ANDROID WIRED], then press to confirm.
8Turn the M.C. dial to select [APP CONTROL], then press to confirm.
9 Turn the M.C. dial to select [P.APP AUTO ON], then press to confirm.
10 Turn the M.C. dial to select [ON], then press to confirm.
11Press SRC/OFF to select any source.
12Connect the Android device to the main unit via USB.
The application on the mobile device starts automatically.
NOTE
When the application does not start, launch it on the Android device.
Android via Bluetooth connection
1Press the M.C. dial to display the main menu.
2Turn the M.C. dial to select [SYSTEM], then press to confirm.
3Turn the M.C. dial to select [PHONE CONNECT], then press to confirm.
4Turn the M.C. dial to select [ANDROID], then press to confirm.
5Turn the M.C. dial to select [BLUETOOTH], then press to confirm.
6Press SRC/OFF to select any source.
7Press and hold the M.C. dial.
The application on the mobile device starts.
NOTE
When the application does not start, check whether your device is properly connected to the main unit via Bluetooth.
If your device is connected properly to the main unit, launch the Pioneer ARC on the Android device.
Radio / Music
Radio screen
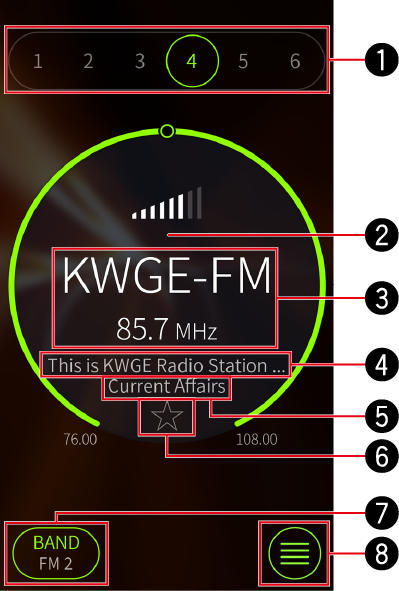

- Tap a button from 1 to 6 to tune into the preset radio station on the connected Pioneer model.

-
The following operations can be performed.
- Tap in the center of the green circle to seek the next radio station.
- Swipe right to go to the previous preset radio station, or swipe left to go to the next preset radio station.
- Rotate the center of the green circle with two fingers to turn up/down the volume.

- Displays the frequency of the radio station currently being received.

- Displays the title of the song you are currently listening to.

- Displays the artist's name of the song you are currently listening to.

- Tap to add the radio station to your favorites or remove the radio station from your favorites.

- Tap to switch the BAND.

- Tap to display the Menu screen.
Playback screen
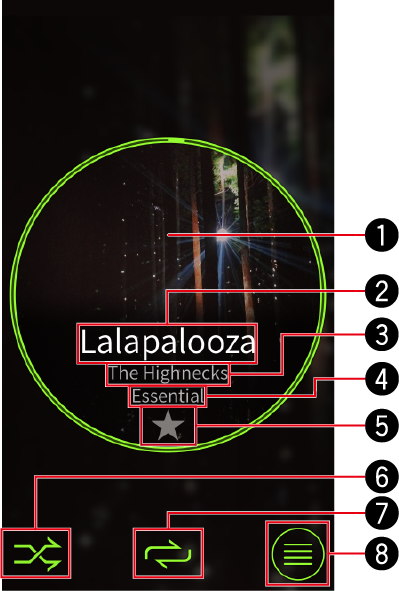
-
The following operations can be performed.
- Tap the center of the circle area to play/pause.
- Rotate the center of the green circle with two fingers to turn up/down the volume.
- Swipe right to go to the previous song, or swipe left to go to the next song.
- Displays the title of the song you are currently listening to.
- Displays the artist's name of the song you are currently listening to.
- Displays the title of album you are currently listening to.
- Tap to add the selected song to your favorites or remove the selected song from your favorites.
- Tap to turn the shuffle play mode on or off.
- Tap to switch the repeat play mode.
- Tap to display the Menu screen.
Selecting a source
When you use the iOS device or Android邃「 application with a compatible Pioneer product, you can switch the Pioneer product to a desired source.
- If you switch to other applications and functions, such as using other iOS device or Android邃「 applications or placing calls, you must restart the Pioneer ARC app on your iOS device or Android邃「.
Selecting a source
1 Swipe up the center of the screen.
2 Swipe right or left at the center of the screen to select the desired source icon.

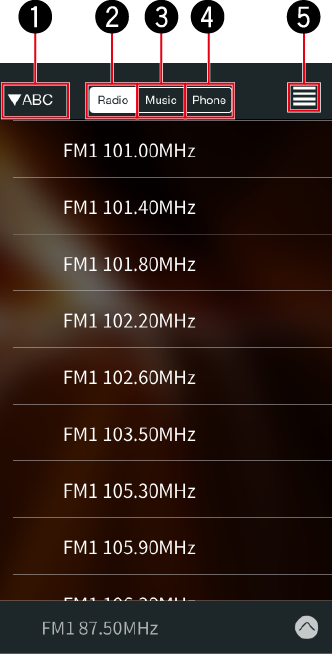
List / Favorites
List screen
To display the List screen, swipe down on the Playback screen.

- Tap to display the Favorites screen.
- Tap to add selected songs to your favorites.
- Mini player
Favorites screen
To display the Favorites screen, tap  at the right top of the List screen.
- Tap to switch the searching option.
- Tap to display radio stations in your favorites.
- Tap to display songs in your favorites.
- Tap to display contact lists in your favorites.
- Tap to display the List screen.
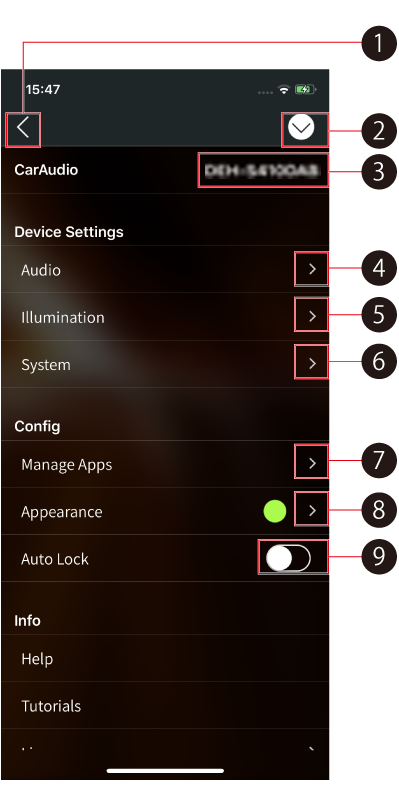
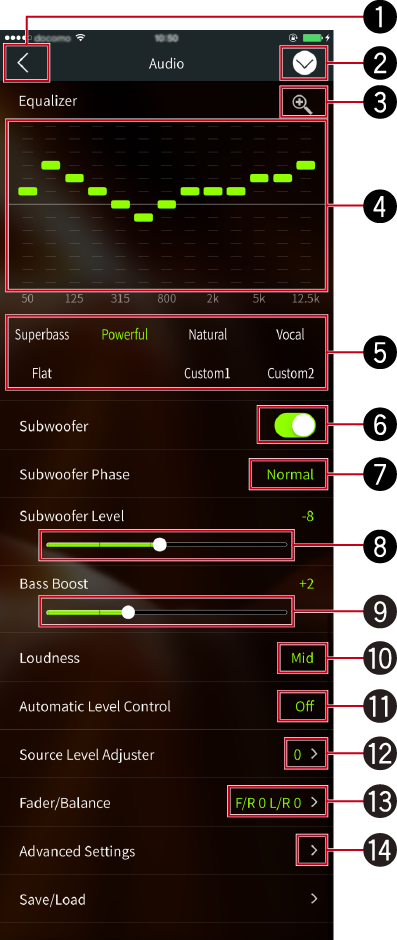
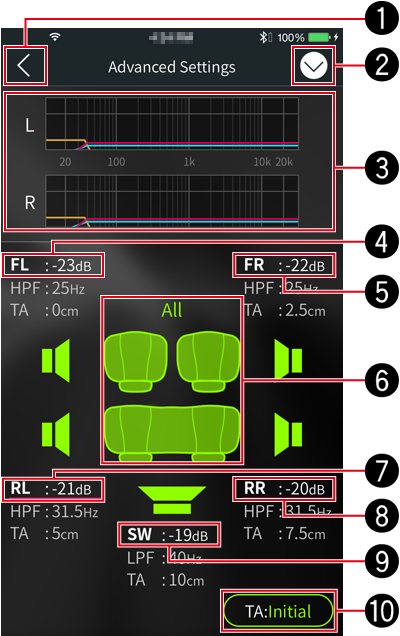
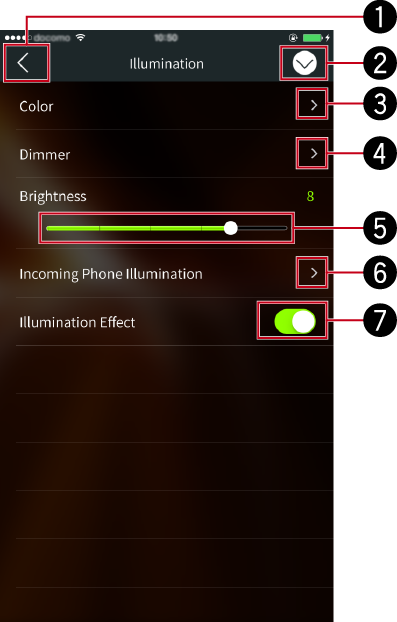
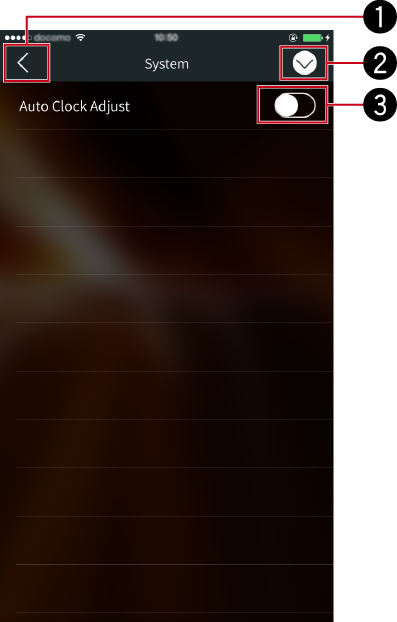
Menu
You can adjust various Pioneer ARC compatible product settings using Pioneer ARC.
To display the Menu screen, tap ![]() on the bottom right of the Radio screen/Playback screen
on the bottom right of the Radio screen/Playback screen